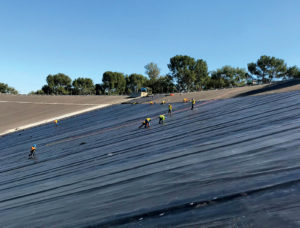
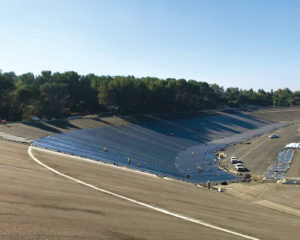
The October/November 2016 issue of Geosynthetics published Part 1 of this series on revitalizing the Palos Verdes Reservoir in Los Angeles County, California. That article described the approach to revitalizing the site, as well as the five-month-long geosynthetic manufacturing and fabrication phase. In Part 2, we continue to explore more of the inner workings for how such large projects are conducted from the geosynthetic vantage point (see Figure 1).
In this installment, we detail the installation process and affiliated testing along with quality assurance (QA) measures involved in executing the project. The decisions made here greatly impact several aspects of the overall project, including the degree to which a facility enters service as designed, whether geosynthetic materials begin their service lives in an as-manufactured condition, and whether long-term performance and operational efficiency is achieved.
Background
Palos Verdes Reservoir has been part of Los Angeles County’s extensive water service network since the late 1930s. The avocado-shaped facility, with a depth of 75 feet (23 m), provides 360 million gallons (1365 billion l) of water storage.
To keep it operating efficiently and to extend its service life greatly, a plan was approved to replace the concrete liner with an asphalt liner overlain by an impermeable geomembrane lining system. Engineers also designed a new floating cover for the facility.
Chlorosulfonated polyethylene (CSPE) geomembranes were selected for the reservoir liner and cover. CSPE geomembranes have been used on many reservoirs in California due to the exceptional durability shown by these liners in exposed environments (often greater than 25 years). Furthermore, 40 years of similar uses of CSPE geomembranes have proven that they outperform other geomembrane formulations in providing resistance to degradation from chlorinated water. On a project efficiency level, CSPE is also a flexible geomembrane, which enables the prefabrication of panels (joining geomembrane panels into large single panels). On a project the size of the Palos Verdes Reservoir, prefabrication offers substantial cost savings and significantly decreases the time window needed for installation, weather permitting.
Rolls of five-ply, 60-mil (1.5-mm) CSPE and three-ply, 45-mil (1.1-mm) CSPE were shipped to the 30,000 square foot (2,800 m2) fabrication facility of Raven Engineered Films, formerly Colorado Lining International, and now branded as Raven CLI, in Colton, California. Raven CLI prefabricated 2.4 million square feet (223,000 m2) of liner and floating cover geomembranes, and prepped for the installation, which the company would also oversee and perform.
Delayed installation
When working with older infrastructure, unique challenges can present themselves. These challenges can delay work or necessitate redesign, as additional site prep might be needed to bring the site up to condition for instituting a modern design.
On the Palos Verdes Reservoir site, delays did occur. Notably, control systems needed to be added to manage subsurface groundwater on the site. While groundwater issues can certainly alter a rehabilitation design, in this case no changes were needed for the original layout, the fabrication plan, or the liner construction sequencing and cover system installation.
The problem did, however, cause the installation work to be pushed out considerably (more than 12 months). Some of the material fabrication was rescheduled as a result. Still, a significant number of the prefabricated panels were already on large rolls. The fabricator shipped those materials to a safe storage and staging zone near the Palos Verdes Reservoir site.
Staged materials included:
- 1.2 million square feet (111,500 m2) of 60-mil (1.5-mm) CSPE geomembrane for the lining system and the same amount of 45-mil (1.1-mm) CSPE geomembrane for the floating cover
- 1.2 million square feet (111,500 m2) of geocomposite material for the cell, sand tubes, float wraps/hatches, the rainwater containment trough (RCT) system and vents
- The lengthy delay between the geomembrane panel fabrication and the approval to begin installation has been a significant challenge. It has placed on-site crews under pressure to execute a speedy installation.
- Another challenge is the site’s limited-access residential setting. Due to local noise restrictions, it is harder to get trucks in and out, and work hours are reduced.
However, these expectations and challenges must be respected, and the work must be completed with both quality and efficiency to meet the project’s goal of providing clean, safe and dependable water to the Metropolitan Water District of Southern California’s customer base.
How the installation is planned and carried out contributes significantly to meeting this goal.
Geosynthetic installation phases
The season in which a project begins changes how geosynthetic installation is conducted. The Palos Verdes Reservoir project was initiated in winter. In this area of Southern California, winter is often rainy. An effective strategy for protecting the site, its personnel and construction equipment is to install groundwater monitors, leak detection pumps, and a stand-alone high-volume pump to eliminate any excess water accumulation as fast and efficiently as possible.
The setting of construction phase time lines is also essential, and that is much more complicated than just the sequence for unrolling liner panels into place. Subgrade work needs to be completed or sometimes adjusted due to site conditions. There are a number of points during which an installation crew might need to wait to conduct certain seaming or anchoring operations before adding material. Special appurtenances or penetrations need to be managed. Testing and QA measures need to be carried out to specification.
These types of delays are factored into the time line for installation.
For example, one of the measures on which the Palos Verdes Reservoir geosynthetic installation had to wait was for the completion of the asphalt subgrade. The combination of a hardscape and a geomembrane creates an effective, long-term performance barrier.
As of the writing of this article (January 2018), the subgrade install is wrapping up. The geosynthetic installation crew is ready to begin full geomembrane liner system works. The subgrade preparation cannot be rushed, though. Its success provides essential stability for the overall system.
Once the asphalt subgrade is completed, the fabricator takes primary control of the reservoir rehabilitation. The general contractor, which had initially planned a 10-month subgrade prep (prior to the extensive delay), coordinates with the fabricator to complete any remaining, limited work still under the general contractor’s responsibility.
The installation is being carried out as such:
Phase 1: Mechanical attachment
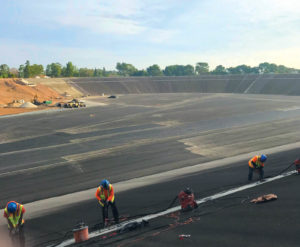
In this phase, 9-inch (23-cm) long, 0.5-inch (13-mm) bolts are embedded 6 inches (15 cm) into the perimeter edge of the reservoir. Special Hilti hammer drills are used here (see Figure 2). These tools are equipped with a vacuum system that eliminates the release of silica dust and drill bits. The technique is used per new Occupational and Safety Health Administration (OSHA) guidelines for silica dust exposure.
Phase 2: Geocomposite
The 1.2 million square feet (111,500 m2) of geocomposite precedes the installation of the CSPE geomembrane. The geocomposite layer is installed directly over the asphalt liner to provide drainage between the geomembrane and asphalt. It also provides highly valuable protection and cushioning for the geomembrane against any potential angular imperfection in the asphalt liner during geomembrane installation and as the hydraulic head in the facility builds up during filling of the reservoir. The geocomposite being used on-site is a geonet nonwoven geotextile composite. Extrusion beading is included on the back side of each bolt to help secure the liner in place and improve performance longevity.
Phase 3: Geomembrane installation
The large prefabricated panels of 60-mil (1.5-mm) CSPE geomembrane are installed soon after the
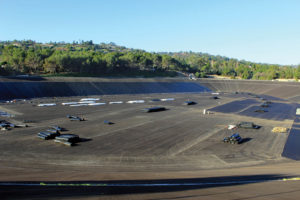
installation of a large section of geocomposite (see Figure 3). This pattern of a geocomposite section followed by a geomembrane over top will continue until the facility is fully lined. Crews also administer a fluid-applied membrane. This waterproofing technology conforms to smooth and irregular-shaped surfaces, and adapts around penetrations for an added level of containment in the facility.
The more detailed work plan tells a better story, though, for how geosynthetic installations function. It also describes how construction sequencing decisions back up all the work put into facility design and allow the materials to go into service in as close to the as-manufactured condition as possible.
For the Palos Verdes Reservoir, the wall panels are installed first, followed by the addition of rope hems to help stabilize the mechanical attachment. The size of the facility means that a little over a mile (~2 km) of rope hem batten bar will be installed. This measure spreads out the pullout force evenly along the back side of the batten bar. Upon completion of the wall panel installation process, floor deployment begins. This sequence must be conducted from the high side to low side to prevent water from infiltrating the floor lining system during construction.
Both the base lining panels and the floating cover panels are flat rolled at 35 feet (10.5 m) wide to eliminate wrinkling, and to keep the liner and cover as flat as possible to facilitate efficient drainage to the rain troughs. Great care is needed to manage how these panels are handled and deployed without damaging liner materials.
Furthermore, the logistics and staging of the geocomposite and geomembrane sections require great care to ensure that equipment does not move/run over any of the 60-mil CSPE geomembrane panels that have already been installed. There are many pieces of equipment on a site that can damage the lining system and many people in motion. Avoiding damage requires great attention and communication between crew members, especially when they are working in different site zones.
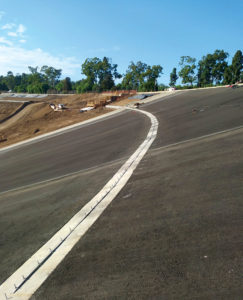
One of the prime places at which the crucial nature of this coordination can be seen is in how the installation crew must coordinate floor panel work with the load out of the cover panels. In this way, material movement is minimized (see Figure 4).
The fabricator uses a special, in-house-designed handling system to move the floating cover panels to their proper location on top of the installed lining. This enhances the crew’s care strategies for avoiding damage to the 60-mil CSPE geomembrane while deploying cover panels into their as-designed positions.
The Palos Verdes Reservoir installation specification calls for a CSPE geomembrane cap strip on every field seam. Air lance testing is subsequently conducted on the factory and field seams to verify their quality. Testing crews also apply a blunt probe in certain areas as an extra check on weld quality.
Several visits by a survey team round out Phase 3. These visits include location shooting and inspection markers. Later, once the reservoir is completed and filled with water, a dive team focused on inspection and reporting can easily find the marked locations.
Phase 4: Floating cover panel installation
As with the reservoir base lining system, crews will also check the geomembrane seams in the floating cover system for integrity using cap stripping and air lance testing on all factory and field welds. This process is expected to take 32 days. The floating cover panels are 45-mil (1.1-mm) CSPE geomembrane.
As noted previously, the process used in the floating cover system is to flat roll the CSPE geomembrane at 35-foot (10.5-m) widths. In doing this, the potential for wrinkles in the system is also minimized. Water moves more efficiently off the cover. The potential for ponding on the cover is minimized. This practice is important, as pooled water on a large surface like a floating cover becomes a breeding ground for mosquitoes, algae and other biomaterials that affect water quality. One of the major performance goals of the floating cover system here is to ensure clean water; by taking special steps in how the materials are handled during installation, the site crew helps reduce some of the water-quality risks to the facility. Future clean water targets are more likely to be met.
Phase 5: Detail work
The floating cover system involves a number of appurtenances, and each of these elements requires care to ensure their use/installation does not affect the integrity of the larger cover. Appurtenances here include sand tubes, hatches, the RCT system, vents, floats and float wraps. Two months for safe and successful completion of this phase is reserved.
Of note, the detail work phase includes the crew instituting aeration fans across the seven zones into which the cover system is divided. Five days of aeration is scheduled for each zone to reduce the potential for volatile organic compound (VOC) development in the system.
Phase 6: Cover inflation
The cover system is divided into seven zones for many reasons, one of which is to optimize inspection of the system from the underside. Installation personnel and the site’s engineering team can easily access the individual zones and identify any minor tasks that must be performed. This zone can then be cleared and deflated within a single day. Inflating the cover zone by zone also improves site safety. The smaller zones provide greater control over air input and exhaust, which affects the ability to deflate rapidly if necessary. The inflation process starts before dawn and is completed before noon. The speed of this process helps minimize any risk of wind damage to an inflated section.
Phase 7: Facility filling
Finally, one arrives at the stage of filling the reservoir. From an installer’s perspective, it is sort of like watching grass grow or paint dry. But, we certainly must be on-site and attentive to the process. A key observation is the proper rise of the cover. One must pay careful attention to any zone in which a structure or attachment could potentially catch on or impede the cover’s rise. In this particular site’s case, there are 10 large polyvinyl chloride (PVC) pump housing systems. These are set in the middle of the RCTs and are kept stable by a weight-and-cable system. These must be monitored to assure that they sink into the RCTs correctly and that all the moving pieces are functioning correctly.
Testing and quality assurance
While great steps are taken to ensure quality in the manufacturing, prefabrication, transport, storage, and on-site handling and welding of geomembrane panels, the seam integrity must be verified. Destructive and nondestructive testing methods are used. This is a vital function of the on-site quality control personnel, and the stringency of their work helps ensure that facilities go into operation as designed.
Palos Verdes Reservoir offers no shortage of work for quality inspections and testing.
Between the floating cover and base lining systems, approximately 91 miles (146 km) of seams will be air lanced. Another 1,552 T-patches will be placed at seam overlaps to guard against pinhole leaks. Every 8 miles (13 km) of liner cap strip must be tested.
Destructive testing is required on every 500 feet (152 m) of field seams. These tests include peel, shear and break strength.
For the prefabricated panels, nearly all of which have been completed and shipped to the site as of the writing of this article, the destructs have been pulled on every prefabricated panel. No failures have been found across the 174 panels of 60-mil and 174 panels of 45-mil CSPE geomembrane (see Figure 5).
The geosynthetic testing and QC began at the manufacturing facility for the CSPE geomembranes, after which the responsibility transitioned to the fabrication crew. From there, rolls were shipped to the job site, where a full-time, on-site QC technician oversaw all testing and quality measures during installation.
The overall process in lining and covering a reservoir is complex, but the strategies used in sequencing the work, strong coordination and an ability to identify where efficiency can be improved without sacrificing the quality of work go a long way toward realizing the goals of project stakeholders.
Part 3 of this series on putting the facility into operation will run in a future issue of Geosynthetics.
 TEXTILES.ORG


Very interested to hear some details regarding the seaming of aged material. The ventilation aspect is also interesting.